Page 1 of 4: DivX 5.2.x Setup
Select the "DivX Pro 5.2.x Codec" (depending on your version of the DivX codec - eg. "DivX Pro 5.2.0 Codec") in the codec selection section of your video conversion/encoding software. Press the "Configure" button or whatever button that let you configure the codec settings, and you should now have access to the configuration options described below (see screenshot below).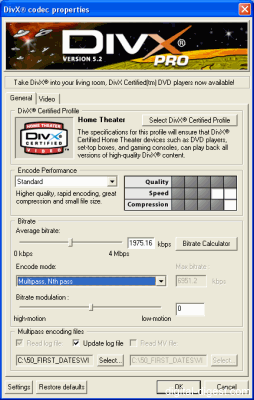
We'll now go through the three major encoding methods (1-pass, 1-pass quality-based and multi pass encoding), and press the links in the steps to find out more about the configuration option. Please also refer to the official DivX guide (large file) for more detailed and technical information on these feature - this guide will provide a quick run through of all the information needed for encoding, while the official guide offers more detailed explanations and technical information.
1-Pass Encoding :
1-pass encoding is the quickest way to encode your video in the DivX format, at the expense of some quality - it allows you to set a fixed average bit-rate to use for the entire encoding. The steps for 1-pass encoding are as follows :- Configure the Profile Setup settings
- Set the Variable bit-rate mode to "1-pass"
- Set the Performance/Quality setting
- Set the Encoding bit-rate
- Go to the "Video" tab
- Adjust the Video Settings
- Adjust the Advanced Settings
1-Pass Quality-Based Encoding :
1-pass quality-based combines some ideas from multi-pass encoding with the quickness offered by single pass encoding - you get to select the quality of the output (using a constant quantizer setting), as opposed to the bit-rate (which will be adjusted accroding to the quantizer you've selected and the source video). The steps for 1-pass quality-based encoding are as follows :- Configure the Profile Setup settings, and select "Disable profiles"
- Set the Variable bit-rate mode to "1-pass quality-based"
- Set the Performance/Quality setting
- Set the Quantizer setting
- Set the Encoding bit-rate
- Go to the "Video" tab
- Adjust the Video Settings
- Adjust the Advanced Settings
Multi-Pass Encoding :
Multi-pass encoding is the best way to achieve maximum quality with the DivX format, at the expense of encoding speed. The passes of a multi-pass encoding gathers information regarding the source video and then the subsequent pass use this information to dynamically adjust the size of the output, to get the best ratio between the specified output file size and video quality. Multi-pass encoding includes at least 2 passes. The steps for multi-pass encoding are as follows :- Configure the Profile Setup settings
- Set the Variable bit-rate mode to "Multipass, 1st pass"
- Set the Performance/Quality setting
- Set the Encoding Log File setting
- Set the Encoding bit-rate (note that some tools like GordianKnot sets this for you automatically)
- Go to the "Video" tab
- Adjust the Video Settings
- Adjust the Advanced Settings
- Go back to your encoding software and either start the encoding, or prepare to setup the next pass options
- Set the Variable bit-rate mode to "Multipass, nth pass"
- Set the Performance/Quality setting (Optional)
- Set the Encoding Log File setting
- Set the Bitrate Modulation setting
- Leave all other settings unchanged (or rather, make sure they match the same settings you used for "Multipass, 1st pass" above)
DivX Pro 5.2.x Codec Configuration Reference
Profiles Setup :
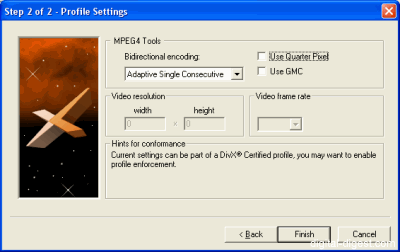
1. Open the Profile WizardProfiles are pre-programmed settings for the DivX codec that conform to standards set by DivX.com, hence ensuring maximum compatibility with DivX devices. This will make sure your encoded video files are compatible with DivX enabled devices that are available on the market (like standard DVD/DivX players).2. Step 1 - Select a DivX Certified Profile
To select a profile, click on the "Select DivX Certified Profile" button.
If you de-select "DivX Certified", this will basically allow you to have access to more options, but at the expense of compatibility.These options allows you to select the three special encoding methods that will try to improve the quality of the encoding, while decreasing the file size.
DivX's use of profiles limits the use of these tools, and you may only be able to select some of these options if you disable the use of profiles.
Use Quarter Pixel - Quarter pixels increases the resolution of motion search, and hence, will improve quality, especially with the fluidity in motion of objects in the distance. The motion search resolution is increased, the search time will be longer and hence, encoding time will be longer as well.
Use GMC - Global Motion Compensation (GMC) is useful in improving the quality of scenes where lots of movement (especially panning, zooming) occur. You should enable this option. Not available when profiles are used
Bidirectional Encoding - Bidirectional encoding allows for the use of B frames in the encoding, in addition to the I-frame (data for this frame is completely stored) and the P-Frame (predicted frame). There are two available options, "Adaptive Single Consecutive" and "Adaptive Multiple Consecutive", otherwise known as single and multiple B frames (may not be supported by DivX certified devices). It is recommended that you enable this option, although if you use high bit-rates or have set performance/quality to "Fastest", it's better to not enable it. Not available for the "Handheld" profile
4. Step 3 - Profile ValidationIf you didn't disable profiles, then you will be able to enter the resolution/framerate of your video. Doing this allows the DivX codec to check that your encoded video will conform to whatever profile/standard you have selected, although it will not affect the actual video encoding. Press "Finish" to end profile configuration.
General Setup :
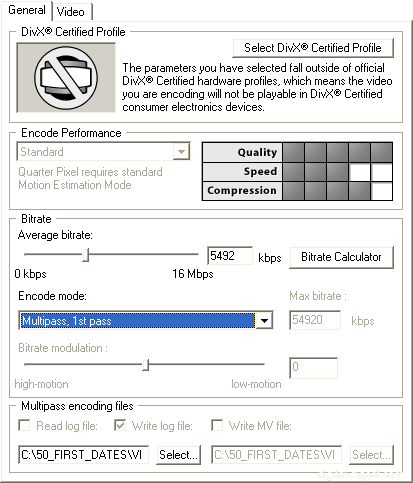
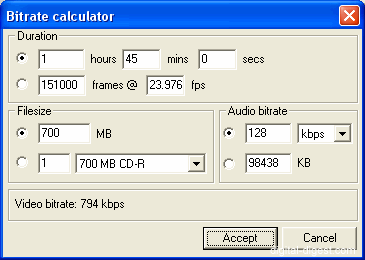
Encoding Performance :Determines tradeoff between performance and quality. Leaving it as Standard gives you the best possible picture/encoding speed ratio, but the "Fast" option has been improved in DivX 5.2 to provide a good quality with added performance gain. The graphic on the right provides a good indication of the quality/speed tradeoffs. A setting of Standard correponds to the "Slowest" setting in the 5.0 version of the DivX Codec, and this is the recommended setting (the quality gains from setting it to a slower setting may not be worth the trouble). If you really want to use the "Slow" or "Slowest" settings (which uses a new "rate-distortion" algorithm), then use it during the last pass, as otherwise, the encoding will take hours for just a minute of video. Not available when Quarter Pixel MPEG4 mode is selected.Encoding Mode :Choose the type of encoding method for this codec.Bitrate Calculator :
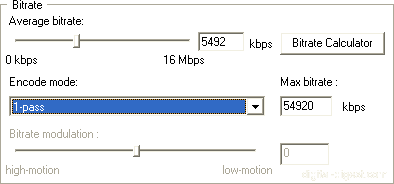
1-pass encoding is similar to DivX 3.11 Alpha's "low motion" encoding, allowing you to specify an adverage bit-rate, which the encode will try to achieve.
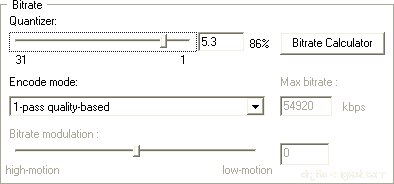
1-pass quality-based encoding is basically constant quantizer encoding (same quantizer used for every frame, and the bit-rate will be adjusted to ensure the quantizer/quality level is reached), but you specify the quality of the output (using the "Quantizer" slider - the lower the quantizer, the higher the quality. Think of the "%" value given as the quality as defined by a percentage of the original source quality), rather than the bit-rate directly. File size, unfortunately, becomes unpredicatable as a result. This option is not available when a profile is selected.
multi-pass is the best encoding option (for smallest file size, and best quality) - multi-pass encoding takes longer than 1-pass encoding : the encoding time is roughly the encoding time of a "1-pass" encoding multiplied by the number of passes (eg. 2-pass takes twice as long, 3-pass takes three times as long ...), but the results may be worth it - multi-pass uses the bitrate you selected as appropriately as possible, to give you both an accurate file size and the best possible looking picture given that bitrate.
DivX 5.0.3 Pro added Nth pass encoding. Previously, only 2-passes were available. Now, you can have as many passes as you want, with each pass giving the DivX codec more information to work with, and hence, achieve a higher quality encoding (at the expense of time, of course). Note that it is very hard to achieve any noticeable quality improvments after 3-passes.
Using Nth pass encoding is similar to using 2-pass encoding : you have a common first pass using the "Multipass - 1st pass", and then subsequent passes can be performed using the "Multipass - nth pass" settings.
MV file - DivX 5.2.x adds MV files, which contains Motion Vector data. This type of logging is no longer recommended by DivXNetworks.
Video Setup :

Psychovisual Enhancement :Just like how MP3 encoding removes bits that the human ear can't hear, to decrease file size, psychovisual enhancement does the same with the video.Enable Crop :Cropping allows you to remove a part of the picture that you don't want encoded - for example, the black bars on widescreen movies (they will be added back by your DivX player anyway, so there is no point wasting bitrate on them). Generally, your conversion tool will have a similar feature, so you should just disable and ignore this section.Enable Resize :Same deal as cropping, except this is for resizing the overall picture - you should just disable and ignore this section.Advanced :Source Pre-processing :This option should really be renamed to "Noise Reduction", as this is what it really does. Unless your source has lots of noise in it (which shouldn't be the case if you are converting from a DVD), so you should just disable it.Scene change thresholdThis setting determines the percentage of blocks not tracked by the motion search algorithm to trigger a scene change. Leave this at 50%, but if you do need to change it, make sure it is between 40% and 60%. This option is ignored when the "Performance/Quality" mode is set to "Slowest".Interlacing :You can encode the video as progressive or interlaced. If your original source is interlaced, then encoding it as interlaced may result in a better looking picture, although it may increase file size. Similarly, encoding the video as progressive if the source is progressive will be benefitial. There are many ways to check if your video source is interlaced or progressive, but using DVD2AVI and checking for the "Frame Type" is a good way to achieve this.Max Keyframe interval
The last option allows you to "Deinterlace all frames", which is just a way to convert the interlaced source into a progressive one. This is not really recommended, as it can lower picture quality.


