Page 1 of 1: QuickTime (.mov) to .avi Conversion Guide using Rad Video Tools
Software you will need:(You will need Rad Video Tools to encode mov files made by Quicktime 4.0 or 5.0.)
In this guide I used a trailer from http://www.drfoster.f2s.com/ . You can download the same one and follow the guide, it might be easier if this is your first time.
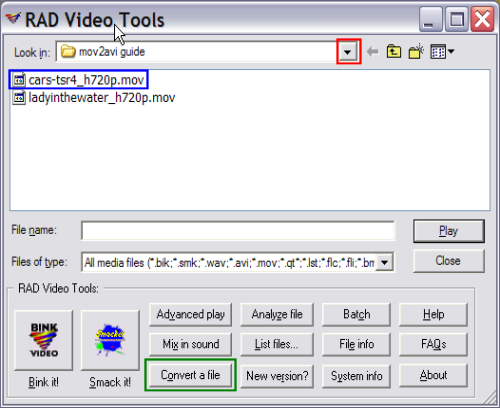
1. Start up Rad Video Tools and find the .mov file that you wish to convert. After you have found it and selected it, click the "Convert a file" button. (Screen Shot Below)
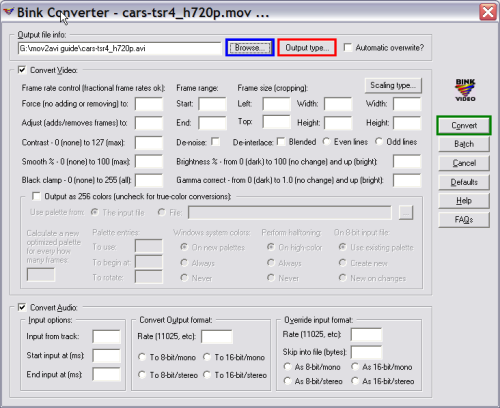
2. Now the "Bink Converter" screen will come up. Click the "Output type..." button and then click "AVI file". Then click the "Browse" button and select a destination directory. Now click the "Convert" button. (Screen Shot Below)
3. After clicking the "Convert" button, the "Bink Converter" and "Video Compression" screens will pop up. From here you would pick the type of compression (codec) to be used in the conversion. Apart from the "Full Frame (Uncompressed)" option (produces files that are too large), codecs such as DivX, XviD, Cinepack, Indeo, are all good choices. If you have lossless codecs installed, then these would be even better. If you wish to convert to DivX/XviD, it doesn't really matter which codec you choose or the codec options, as you can use AutoGK later on to optimize the encoding (see last step). Once you have selected the codec and codec options, click ok. (Screen Shot Below)
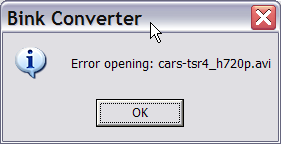
[If you receive this error message, just click ok and download the application Total Recorder 3.0+. After starting this application you must press the recording button and start your Quick Time Movie. Total Recorder will only record the sound that comes from the Quick Time Movie. After recording, you have to save it as a .wav and multiplex it for TMPGEnc program or similar.] (Screen Shot of Error Message Below)
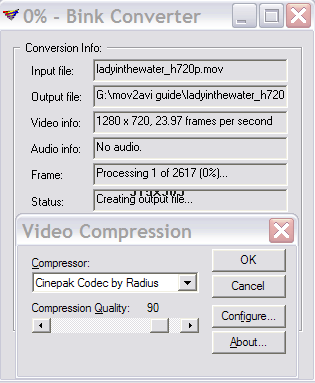
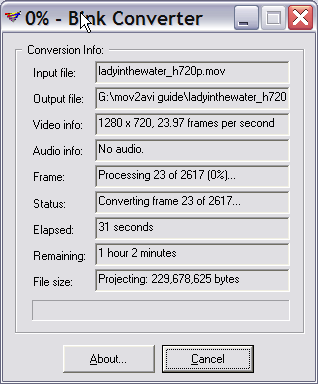
After clicking ok, the "Bink Converter" will come up and display all the current information it has for the .avi you are creating. It will also show you how long the conversion is going to take. (Screen Shot Below)
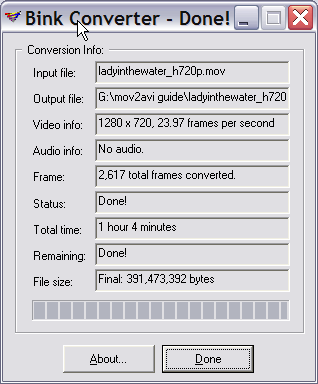
When it completes, you should see this screen. (Screen Shot Below)
You have just managed to successfully convert your QuickTime .mov file to AVI. The AVI file that you now may not be optimized for size and quality. To make the AVI smaller and retain the current quality, you can try converting the AVI to DivX/XviD format with MP3 audio, and instructions on how to do this can be found in this guide:
http://www.divx-digest.com/articles/autogk.html#step1
In this guide I used a trailer from http://www.drfoster.f2s.com/ . You can download the same one and follow the guide, it might be easier if this is your first time.
1. Start up Rad Video Tools and find the .mov file that you wish to convert. After you have found it and selected it, click the "Convert a file" button. (Screen Shot Below)

2. Now the "Bink Converter" screen will come up. Click the "Output type..." button and then click "AVI file". Then click the "Browse" button and select a destination directory. Now click the "Convert" button. (Screen Shot Below)

3. After clicking the "Convert" button, the "Bink Converter" and "Video Compression" screens will pop up. From here you would pick the type of compression (codec) to be used in the conversion. Apart from the "Full Frame (Uncompressed)" option (produces files that are too large), codecs such as DivX, XviD, Cinepack, Indeo, are all good choices. If you have lossless codecs installed, then these would be even better. If you wish to convert to DivX/XviD, it doesn't really matter which codec you choose or the codec options, as you can use AutoGK later on to optimize the encoding (see last step). Once you have selected the codec and codec options, click ok. (Screen Shot Below)
[If you receive this error message, just click ok and download the application Total Recorder 3.0+. After starting this application you must press the recording button and start your Quick Time Movie. Total Recorder will only record the sound that comes from the Quick Time Movie. After recording, you have to save it as a .wav and multiplex it for TMPGEnc program or similar.] (Screen Shot of Error Message Below)


After clicking ok, the "Bink Converter" will come up and display all the current information it has for the .avi you are creating. It will also show you how long the conversion is going to take. (Screen Shot Below)

When it completes, you should see this screen. (Screen Shot Below)

You have just managed to successfully convert your QuickTime .mov file to AVI. The AVI file that you now may not be optimized for size and quality. To make the AVI smaller and retain the current quality, you can try converting the AVI to DivX/XviD format with MP3 audio, and instructions on how to do this can be found in this guide:
http://www.divx-digest.com/articles/autogk.html#step1


